C++ Deque
Descriptions
A deque, is more flexible, as data’s can be added and removed from both ends (at the front and the back). You can also access data’s by index numbers.
To use a deque, you have to include the <deque> header file
விரிவுரை
ஒரு டீக்யூ, அதிக நெகிழ்வானது, ஏனெனில் தரவை இரு முனைகளிலிருந்தும் (முன் மற்றும் பின்புறம்) சேர்க்கலாம் மற்றும் அகற்றலாம். குறியீட்டு எண்கள் மூலமாகவும் தரவை அணுகலாம்.
டீக்யூவைப் பயன்படுத்த, நீங்கள் <deque> தலைப்புக் கோப்பைச் சேர்க்க வேண்டும்.
Syntax
// Include the deque library
Create / Access / Change Deque
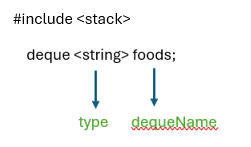
Use the deque keyword to create a deque, and specify the type of data’s it should store within angle brackets <> and then the name of the deque, like: deque<type> dequeName.
ஒரு deque ஐ உருவாக்க deque முக்கிய சொல்லைப் பயன்படுத்தவும், மேலும் கோண அடைப்புக்குறிக்குள் அது சேமிக்க வேண்டிய தரவு வகையைக் குறிப்பிடவும், பின்னர் deque இன் பெயரைக் குறிப்பிடவும், அதாவது: deque<type>dequeName.
deque data’s can be accessed /changed by index, by entering number inside square brackets []
சதுர அடைப்புக்குறிக்குள் எண்ணை உள்ளிடுவதன் மூலம், குறியீட்டு மூலம் deque தரவை அணுகலாம் []
Example / உதாரணம்
#include <iostream>
#include <deque>
using namespace std;
int main() {
deque<string> foods ={“Idly”, “Vadai”} ;
cout<<foods.front(); // Idly
cout<<“\n”;
cout<<foods.at(1); // Outputs Vadai
foods.at(1) = “Dosa”;
cout<<“\n”;
cout<<foods.back(); // Dosa
return 0;
}
Output :
Idly
Vadai
Dosa
Add/ Change / Remove Deque
use .push_front() to insert a data at the beginning of the deque and .push_back() to add a data at the end
use .pop_front() to remove a data from the beginning of the deque and .pop_back() to remove a data at the end
To change the data of a deque, you can refer to the index number
deque-வின் தொடக்கத்தில் ஒரு தரவைச் செருக .push_front() ஐப் பயன்படுத்தவும், இறுதியில் ஒரு தரவைச் சேர்க்க .push_back() ஐப் பயன்படுத்தவும்
deque-வின் தொடக்கத்தில் இருந்து ஒரு தரவை நீக்க .pop_front() ஐப் பயன்படுத்தவும், இறுதியில் ஒரு தரவை நீக்க .pop_back() ஐப் பயன்படுத்தவும்
ஒரு deque-வின் தரவை மாற்ற, நீங்கள் குறியீட்டு எண்ணைப் பார்க்கலாம்.
Example / உதாரணம்
#include <iostream>
#include <deque>
using namespace std;
int main() {
deque<string> foods ={“Idly”, “Vadai”} ;
cout<<foods.front(); // Idly
cout<<“\n”;
cout<<foods.at(1); // Outputs Vadai
foods.at(1) = “Dosa”;
cout<<“\n”;
cout<<foods.back(); // Dosa
foods.push_front(“MasalDosa”);
foods.push_back(“Kesari”);
cout<<“\n”;
cout<<foods.at(0); // MasalDosa
cout<<“\n”;
cout<<foods[2]; //Dosa
cout<<“\n”;
cout<<foods.at(3); // Kesari
return 0;
}
Output :
Idly
Vadai
Dosa
MasalDosa
Dosa
Kesari
Deque size and empty
To find size of deque, use the .size() function and to check queue is empty or not use .empty() function returns 1 (true) when deque is empty. 0 (false) when data is in deque.
deque இன் அளவைக் கண்டறிய, .size() செயல்பாட்டைப் பயன்படுத்தவும், வரிசை காலியாக உள்ளதா இல்லையா என்பதைச் சரிபார்க்க, deque காலியாக இருக்கும்போது .empty() செயல்பாட்டைப் பயன்படுத்தவும், deque காலியாக இருக்கும்போது 1 (true) ஐயும், தரவு deque இல் இருக்கும்போது 0 (false) ஐயும் வழங்கும்.
Looping in Deque
you can loop through the deque data’s by using a for loop combined with the .size() function
.size() செயல்பாட்டோடு இணைந்து ஒரு for loop ஐப் பயன்படுத்தி deque தரவை லூப் செய்யலாம்.
Example / உதாரணம்
#include <iostream>
#include <deque>
using namespace std;
int main() {
deque<string> foods ={“Idly”, “Vadai”} ;
cout<<foods.front(); // Idly
cout<<“\n”;
cout<<foods.at(1); // Outputs Vadai
foods.at(1) = “Dosa”;
cout<<“\n”;
cout<<foods.back(); // Dosa
foods.push_front(“MasalDosa”);
foods.push_back(“Kesari”);
cout<<foods.at(0); // MasalDosa
cout<<“\n”;
cout<<foods[2]; //Vadai
cout<<“\n”;
cout<<foods.at(3); // Kesari
cout<<“\n”;
cout<<“Before for loop”;
cout<<“\n”;
for(int i = 0; i < foods.size(); i++) {
cout << foods[i] << “\n”;
}
return 0;
}
Output:
Idly
Vadai
DosaMasalDosa
Dosa
Kesari
Before for loop
MasalDosa
Idly
Dosa
Kesari